Contents
DIY Guide: How to Install an Under Sink Water Purifier System
Are you tired of drinking tap water that tastes bad? You don’t have to tolerate it anymore! Installing an under sink water purifier system is a great way to improve the quality of your drinking water.
Installing an under sink water purifier system does not require a professional plumber. All you need are some basic tools and a little bit of DIY spirit! With this DIY guide, you can easily install your own under sink water purifier system and enjoy fresh and clean water at all times.
Some of the benefits of installing an under sink water purifier system are:
- Removes impurities from tap water such as chlorine, lead, and pesticides
- Improves the taste and odor of water
- Saves money compared to buying bottled water
- Lowers the risk of health issues caused by contaminated water
The installation process for an under sink water purifier system involves:
- Shutting off the water supply
- Disconnecting the faucet and drain pipes
- Mounting the filter housing and faucet
- Connecting the filter housing and faucet to the water supply and drain pipes
- Testing the system for leaks and proper function
With this guide and a little effort, you can improve your drinking water quality and ensure that your family is drinking safe and clean water.

💧 = Use the coupon code SALEG3P800 to save $150 OFF on the 800GPD Tankless RO System with UV Sterilizing Light – Waterdrop G3P800 = 💧
Introduction
If you’re concerned about the quality of the water that comes out of your sink, you may want to consider installing an under sink water purifier system. While there are many different types of water purifiers available, an under sink system can be a relatively easy and affordable option that provides you with clean, safe drinking water.
Materials Needed
- Under sink water purifier system
- Adjustable wrench
- Drill
- Hole saw
- Teflon tape
- Bucket
Step 1: Turn off the Water Supply
Before you begin installing the under sink water purifier system, you’ll need to turn off the water supply to your sink. Locate the shut-off valve under your sink and turn it to the off position. If you’re having trouble finding the shut-off valve, you may need to turn off the water supply to your entire home.
Step 2: Install the Purifier Unit
Next, you’ll need to install the purifier unit under your sink. The specific instructions for this step will depend on the type of under sink water purifier system you’ve purchased, so be sure to read the manufacturer’s instructions carefully.
Step 3: Drill a Hole
Once the purifier unit is installed, you’ll need to drill a hole through your sink or countertop to allow the purified water to flow through. To do this, mark the location where you want the hole to be and use a hole saw to drill through the sink or countertop. Make sure to drill a hole that is the right size for the faucet that came with your water purifier system.
Step 4: Attach the Faucet
After you’ve drilled the hole, you’ll need to attach the faucet that came with your water purifier system to your sink or countertop. Again, the specific instructions for this step will depend on the type of system you have, so be sure to follow the manufacturer’s instructions carefully.
Step 5: Connect the Hoses
Next, you’ll need to connect the hoses from the purifier unit to the faucet and to the shut-off valve under your sink. Use an adjustable wrench to securely tighten all of the connections, and use Teflon tape to create a watertight seal.
Step 6: Test the System
Once you’ve connected everything, it’s time to test the system. Turn the water supply back on and let the water flow through the system for a few minutes to flush out any air or debris. Then, turn on the faucet and check the water flow and taste to make sure everything is working properly.
Conclusion
Installing an under sink water purifier system can be a great way to ensure that you and your family are drinking clean, safe water. While the process may seem intimidating at first, following the manufacturer’s instructions carefully and taking the time to properly connect all of the hoses and components can make it a relatively simple DIY project.
For more information on water purifier systems, check out our guide to buying a water purifier.
Keywords
DIY, under sink water purifier, water safety, installation, clean water, water purifier system, Teflon tape, adjustable wrench, hole saw, shut-off valve
💧 = Use the coupon code SALEG3P800 to save $150 OFF on the 800GPD Tankless RO System with UV Sterilizing Light – Waterdrop G3P800 = 💧
Shop now for Waterdrop N1
Frequently Asked Questions about DIY Guide: How to Install an Under Sink Water Purifier System
What is an under sink water purifier system?
An under sink water purifier system is a compact water filtration system that can be installed under your kitchen sink. It is designed to remove impurities and contaminants from your tap water, providing you with clean and safe drinking water.
Is it easy to install an under sink water purification system?
Yes, installing an under sink water purification system is a fairly simple task that can be accomplished with basic plumbing skills. Most brands come with an installation guide and step-by-step instructions to guide you through the process.
What tools do I need to install an under sink water purifier?
- Adjustable wrench
- Pipe wrench
- Hacksaw
- Screwdriver
- Teflon tape
Can I install an under sink water purifier system by myself?
Yes, with basic plumbing skills and following the manufacturer’s installation guide, you can install an under sink water purifier system by yourself. However, it’s important to note that if you’re unsure of your plumbing skills, it’s best to hire a professional plumber to complete the installation.
What are the benefits of installing an under sink water purifier system?
- Improves the taste and odor of your tap water
- Removes harmful contaminants and impurities from your drinking water
- Reduces your reliance on bottled water and saves you money in the long run
- Convenient and easily accessible clean drinking water
What type of maintenance is required for an under sink water purifier system?
Maintenance requirements vary depending on the brand and model of the under sink water purifier system. However, most systems require periodic filter changes, which can range from every 3 to 6 months. It’s important to follow the manufacturer’s maintenance instructions to ensure the longevity and effectiveness of the system.

What Are the Benefits of Using an Under Sink Water Purifier System?
If you are looking for a convenient and effective way to purify your drinking water, an under sink water purifier system may be just what you need. With this system, you can enjoy a wide range of benefits that will help you stay healthy and hydrated.
Improved Water Quality
One of the most significant benefits of using an under sink water purifier system is improved water quality. This system is designed to remove impurities and contaminants from your drinking water, such as chlorine, lead, and bacteria. As a result, you can enjoy cleaner, safer, and better-tasting water all year round.
Cost-Effective Solution
An under sink water purifier system is also a cost-effective solution for your drinking water needs. Unlike bottled water, which can be expensive and produce unnecessary plastic waste, an under sink system allows you to purify your tap water for a fraction of the cost. Plus, you can enjoy the convenience of having purified water available at all times without having to leave your home or office.
Easy to Install
Another advantage of using an under sink water purifier system is that it is easy to install. This system can usually be installed by a professional plumber in a matter of hours, and many models come with user-friendly instructions that make installation a breeze. Once your system is up and running, you can enjoy worry-free access to clean drinking water whenever you need it.
Overall, an under sink water purifier system is an excellent investment for anyone who values clean drinking water and wants to enjoy the convenience of purified water at home or in the office. So why not consider adding this system to your home or workplace today?
Learn more about water purification
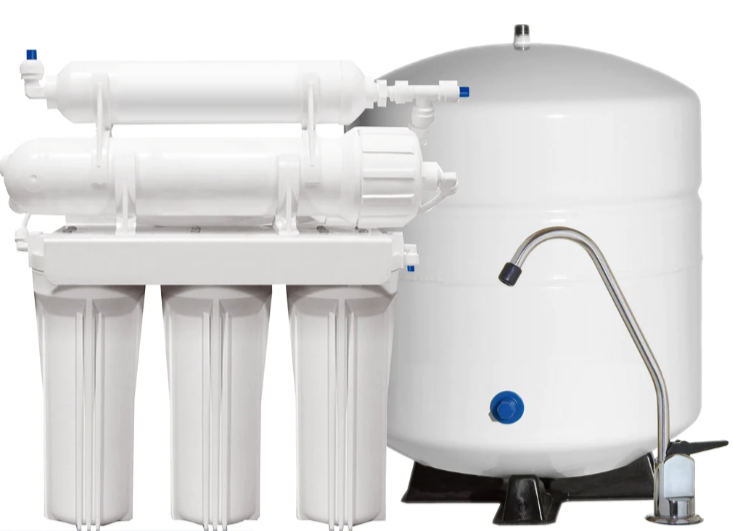
DIY Guide: How to Install an Under Sink Water Purifier System
Overview
- Under sink water purifier systems are an easy and convenient way to ensure clean drinking water at home.
- Installing a system takes some basic plumbing knowledge, but can be done in a few hours with the right tools and instructions.
Tools Needed
- Adjustable wrench
- Screwdriver
- Teflon tape
- Pipe cutter
- Drill and drill bit
- Mounting bracket
Step-by-Step Instructions
- Turn off the water supply to the sink and disconnect the water line from the faucet.
- Install the mounting bracket for the water filter system under the sink.
- Cut a section of the cold water supply line and install the shut-off valve provided in the water filter kit.
- Connect the water supply line to the inlet of the filter system using an adjustable wrench and Teflon tape.
- Connect a new water line from the outlet of the filter unit to the incoming water line of the faucet.
- Install the new faucet provided in the purifier kit.
- Turn the water supply back on and check for any leaks.
Conclusion
- Installing an under sink water purifier system is a simple and cost-effective way to ensure clean drinking water at home.
- With the right tools and instructions, most homeowners can install a system in a few hours.
- Following these step-by-step instructions can help you enjoy clean, safe drinking water in your home.
💧 = Use the coupon code SALEG3P800 to save $150 OFF on the 800GPD Tankless RO System with UV Sterilizing Light – Waterdrop G3P800 = 💧
Category – Reverse osmosis and filters