Contents
Incorporating Reverse Osmosis into Your Home: A Step-by-Step Guide
Are you tired of impurities in your tap water affecting its taste and quality? Incorporating a reverse osmosis system into your home can be the perfect solution. With this step-by-step guide, you will learn how to install and maintain a reverse osmosis system for clean and purified water.
Reverse osmosis is a water filtration process that removes contaminants, particles, and dissolved substances from water by applying pressure to force it through a semipermeable membrane. By doing so, it ensures that you have access to clean, safe, and great-tasting water right at home.
Step 1: Evaluate Your Water Supply
The first step is to evaluate your water supply and determine the level of filtration required. Conduct a water test to identify impurities present in your tap water. This will help you select an appropriate reverse osmosis system with the necessary filtration capacity.
Step 2: Choose the Right Reverse Osmosis System
Based on the test results, select a reverse osmosis system that meets your needs. Consider factors such as installation space, water usage, and the number of filtration stages required. Research various models and read customer reviews to make an informed decision.
Step 3: Gather the Necessary Tools and Materials
Before starting the installation process, make sure you have all the required tools and materials. This typically includes a wrench, tubing cutter, drill, screwdriver, Teflon tape, and the reverse osmosis system kit. Ensure you follow the manufacturer’s instructions for specific tool requirements.
Step 4: Install the Reverse Osmosis System
Follow the manufacturer’s instructions to install the reverse osmosis system. This usually involves attaching the system to your water supply, connecting the tubing, and installing the faucet. Take your time and ensure all connections are secure to prevent leaks.
Step 5: Test and Maintain the System
After installation, conduct a test run to check for any leaks or issues. Ensure all connections are tight and the system is working properly. Regularly maintain the system by replacing filters as recommended by the manufacturer to ensure optimal performance.
By incorporating reverse osmosis into your home, you can enjoy the benefits of clean, purified water for drinking, cooking, and other household tasks. Follow this step-by-step guide to ensure a successful installation and long-lasting performance of your reverse osmosis system.

💧 = Use the coupon code SALEG3P800 to save $150 OFF on the 800GPD Tankless RO System with UV Sterilizing Light – Waterdrop G3P800 = 💧
Incorporating Reverse Osmosis into Your Home: A Step-by-Step Guide
What is Reverse Osmosis?
Reverse osmosis (RO) is a water filtration process that removes impurities from water by applying pressure to
force it through a semipermeable membrane. It is an effective method to improve water quality and provide a
cleaner and healthier water supply.
Why Incorporate Reverse Osmosis into Your Home?
There are several reasons why adding a reverse osmosis system to your home can be beneficial:
- Removal of contaminants: Reverse osmosis removes impurities such as bacteria, viruses, chlorine, fluoride,
lead, and other harmful substances, ensuring your drinking water is safe and clean. - Taste and odor improvement: RO removes unpleasant tastes and odors from water, making it more enjoyable to
drink and cook with. - Health benefits: By eliminating toxins and impurities, reverse osmosis provides healthier water, which can
positively impact your overall well-being. - Convenience: Having a dedicated source of purified water at home eliminates the need for buying bottled
water, saving you money and reducing plastic waste.
Step 1: Assessing Your Water Quality
Before installing a reverse osmosis system, it’s essential to evaluate your water quality. You can perform a
water test or contact a local laboratory to get your water analyzed. Understanding the contaminants present in
your water will help you choose the appropriate RO system and additional filtration options, if necessary.
Step 2: Choosing the Right Reverse Osmosis System
There are various reverse osmosis systems available in the market. Consider the following factors when
selecting one for your home:
- Water usage: Determine the system capacity based on your household’s water consumption needs.
- System size: Take into account the available space for installation.
- Quality of components: Look for reliable brands with high-quality membranes and filters.
- Additional features: Some systems may include remineralization or UV sterilization for enhanced water
quality.
Step 3: Installation Process
Although the installation procedure may vary depending on the specific system, here are the general steps
involved:
- Locate a suitable location for your RO system, ideally close to the water source and with easy access for
maintenance. - Shut off the main water supply and relieve any pressure in the system.
- Install the pre-filter and connect it to the cold-water supply.
- Assemble the RO unit by following the manufacturer’s instructions.
- Attach the RO unit to the pre-filter and connect the wastewater tube to the drain.
- Turn on the water supply, check for leaks, and allow the system to flush before using the purified water.
Step 4: Maintenance and Filter Replacement
Regular maintenance and filter replacements are crucial to ensure the optimal performance of your reverse
osmosis system. Follow the manufacturer’s guidelines for routine maintenance tasks such as sanitization and
filter changes.
Conclusion
Incorporating reverse osmosis into your home is an excellent investment for clean and safe drinking water.
By following this step-by-step guide, you can successfully install an RO system, improve your water quality,
and enjoy the many benefits it offers.
If you’re interested in exploring more home water filtration options, check out our Guide to Home Water Filtration Systems for
additional insights.
💧 = Use the coupon code SALEG3P800 to save $150 OFF on the 800GPD Tankless RO System with UV Sterilizing Light – Waterdrop G3P800 = 💧
Shop now for Waterdrop N1
Frequently Asked Questions
What is reverse osmosis?
Reverse osmosis is a water purification process that uses a partially permeable membrane to remove ions, molecules, and larger particles from drinking water. It is an effective method for improving the quality and taste of tap water.
Why should I consider incorporating reverse osmosis into my home?
There are several reasons to consider incorporating reverse osmosis into your home:
- It removes contaminants, such as lead, fluoride, chlorine, and bacteria, from your drinking water.
- It improves the taste and odor of tap water.
- It provides a convenient and cost-effective alternative to buying bottled water.
- It promotes good health by ensuring you have access to clean and safe drinking water.
How does reverse osmosis system work?
A reverse osmosis system works by applying pressure to push tap water through a semipermeable membrane. This membrane allows water molecules to pass through, while blocking contaminants and impurities. The purified water is collected in a storage tank, ready for consumption.
How can I incorporate reverse osmosis into my home?
Here is a step-by-step guide:
- Assess your water quality to determine if reverse osmosis is necessary.
- Choose a suitable reverse osmosis system based on your needs and budget.
- Install the reverse osmosis system under your kitchen sink or in a convenient location.
- Connect the system to your home’s water supply and a separate faucet for dispensing purified water.
- Flush the system and run a few test cycles to ensure proper functioning.
- Regularly maintain the system by replacing filters and following manufacturer instructions.
How often should I replace the filters in my reverse osmosis system?
The frequency of filter replacement depends on various factors, including the quality of your water and the specific system you choose. Generally, it is recommended to replace the pre-filter every 6 months and the post-filter every 12 months. The reverse osmosis membrane should typically be replaced every 2-3 years.
Is professional installation necessary for incorporating reverse osmosis into my home?
While it is possible to install a reverse osmosis system yourself, professional installation is recommended, especially if you are not familiar with plumbing or have specific requirements. Professional installers can ensure that the system is properly connected and functioning correctly.

Join the Reverse Osmosis Community on Reddit
Reddit is a popular platform where enthusiasts, professionals, and curious individuals can connect, discuss, and learn about various topics. If you are interested in reverse osmosis, there is an active community on Reddit waiting for you.
Why Join the Reverse Osmosis Community?
The reverse osmosis community on Reddit is a great place to share your knowledge, ask questions, and engage with like-minded individuals. Whether you are a beginner looking to understand the basics or an expert willing to provide valuable insights, this community welcomes everyone.
Get Valuable Information
By joining this community, you gain access to a vast pool of information related to reverse osmosis. Users share their experiences, tips, and tricks, helping you make informed decisions. From choosing the right reverse osmosis system for your home to troubleshooting common issues, the community has got you covered.
Engage in Discussions
Reddit is known for its lively discussions, and the reverse osmosis community is no different. Engage in conversations, ask questions, and share your opinion on various topics. You can gain a deeper understanding of reverse osmosis and learn from the experiences of others.
If you are ready to dive into the world of reverse osmosis and join the Reddit community, visit the Reverse Osmosis subreddit here.
Learn more about reverse osmosis on Wikipedia.
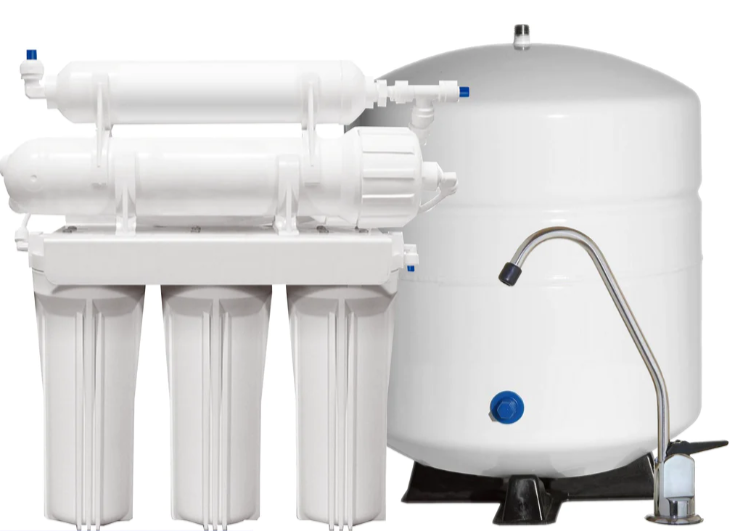
Incorporating Reverse Osmosis into Your Home: A Step-by-Step Guide
Introduction
- Understanding the benefits of reverse osmosis
- Exploring why it is worth incorporating into your home
Step 1: Assess Your Water Quality
- Evaluating the source and cleanliness of your water
- Performing water tests to determine contaminant levels
Step 2: Choose the Right Reverse Osmosis System
- Understanding different types of reverse osmosis systems
- Considering factors like capacity, efficiency, and cost
Step 3: Gather Necessary Tools and Materials
- Creating a checklist of items required for installation
- Gathering tools like wrenches, tubing, and a drill
Step 4: Find an Ideal Location for Installation
- Identifying a convenient and accessible spot for the system
- Ensuring proper spacing and clearance for maintenance
Step 5: Prepare for Installation
- Shutting off the water supply and draining the pipes
- Removing any existing filtration systems or components
Step 6: Install the Reverse Osmosis System
- Following the manufacturer’s instructions for setup
- Connecting the system to the water supply and drainage
Step 7: Test and Adjust the System
- Running initial tests and checking for leaks or malfunctions
- Adjusting settings and fine-tuning the system’s performance
Step 8: Maintain and Replace Filters
- Creating a schedule for regular filter replacements
- Performing maintenance tasks to ensure optimal functionality
Conclusion
- Enjoying the benefits of clean and purified water in your home
- Appreciating the ease and convenience of a reverse osmosis system
💧 = Use the coupon code SALEG3P800 to save $150 OFF on the 800GPD Tankless RO System with UV Sterilizing Light – Waterdrop G3P800 = 💧
Category – Reverse osmosis and filters